WordPress Caching: A Complete Guide to Page Cache, Object Cache & Browser Cache
Caching is the highest-impact WordPress performance lever — and the most misunderstood. Here's how each caching layer works, which tools to use, and how to configure them correctly.
Installing a caching plugin is one of the first things people do when they want to speed up a WordPress site. It’s also one of the things that causes the most confusion — not because caching is complicated, but because “caching” refers to at least three different mechanisms that operate at different layers of your stack, and most guides treat them as interchangeable.
This guide explains what each caching layer does, which tools are worth using, and how to configure them so they actually work. If you’re looking for a broader overview of performance improvements, the WordPress speed checklist covers the full picture — caching is one item on that list, not the whole thing.
The three types of WordPress caching
Before comparing any plugins, you need to understand that “caching” in the WordPress context means three distinct things, each solving a different problem.
Page cache
A WordPress page is dynamic by default: every request triggers PHP, which queries the database, assembles the page, and sends HTML to the browser. That’s a lot of work for a page whose content hasn’t changed since the last visitor loaded it.
Page caching intercepts that process. The first time a visitor requests a page, the assembled HTML is saved to disk (or memory). Every subsequent request for that same page gets the saved copy instead of triggering PHP and database queries. The server skips most of its work, and the response reaches the visitor faster.
This is the caching type that makes the biggest visible difference to server response time and LCP. A WordPress site without page caching will almost always fail the TTFB threshold at any meaningful traffic level.
Page cache only works for anonymous (logged-out) visitors — WordPress needs to generate personalized pages for logged-in users, and it needs to handle dynamic elements like cart contents, forms, and nonces correctly. Proper page cache configuration excludes the right pages and cookies automatically.
Object cache
WordPress makes a lot of database queries. Many of them retrieve the same data repeatedly within a single page load — site options, post metadata, widget output, plugin configuration. Object caching stores the results of those queries in memory so that repeated lookups skip the database entirely.
Without object cache: each page load may hit the database dozens of times for data that hasn’t changed.
With object cache: the first query hits the database and stores the result in memory. Every subsequent query for the same data reads from memory in microseconds.
WordPress has a built-in object cache, but it’s transient — it only persists for the duration of a single PHP process. To make it persistent across requests, you need a backend: Redis or Memcached. Without one, you get object caching within a single request but not across requests.
Object cache has a larger impact on sites with heavy dynamic content, high traffic, or lots of database-heavy plugins. It’s less visible on simple static sites but meaningfully reduces database load across the board.
Browser cache
The two types above live on your server. Browser cache lives on the visitor’s device.
When a browser downloads a CSS file, a JavaScript file, or an image, cache-control headers tell it how long to hold onto that file before requesting it again. Without those headers, every page load re-downloads every asset. With them, repeat visitors load your site using assets already on their device.
Browser cache won’t help a first-time visitor at all — they have nothing cached yet. But for returning visitors, it dramatically reduces the number of resources the browser needs to fetch. It also affects how browsers handle navigation between your own pages.
Server-level caching vs. plugin-based caching
Page caching can happen at two levels: inside PHP (plugin-based) or in front of PHP (server-level).
Plugin-based caching (WP Rocket, W3 Total Cache, LiteSpeed Cache) runs as a WordPress plugin. It hooks into WordPress’s request handling, generates the cached output, and saves it. The caching logic lives inside PHP — which means PHP still has to start up for every request, even if only to check the cache and serve a static file.
Server-level caching (Nginx FastCGI cache, Varnish, LiteSpeed’s server-side module) operates in front of PHP entirely. The web server intercepts cached requests before PHP is invoked. The server skips PHP startup and serves static HTML directly, which is significantly faster. This approach requires server configuration access — something you typically have on a VPS, a dedicated server, or a properly configured managed environment.
Most plugin-based caches can write static HTML files to disk and configure the web server to serve those files directly, which gets closer to server-level speed without requiring server access. WP Rocket and W3TC both do this — look for “serve cache files to anonymous users without loading WordPress” in their settings.
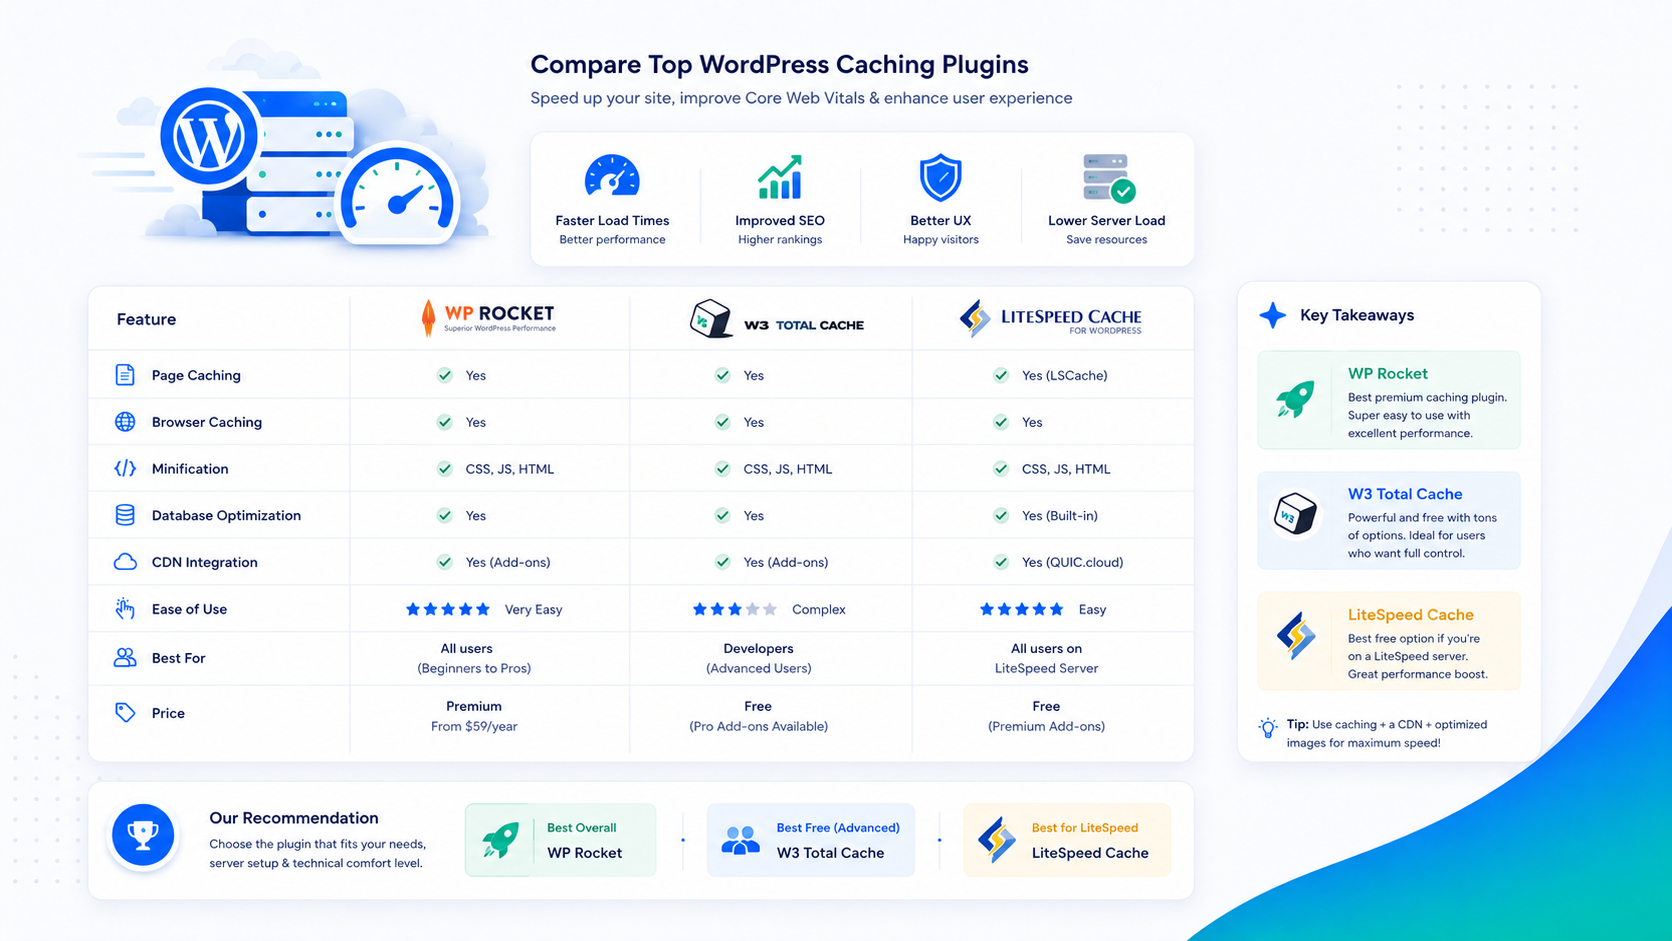
Plugin comparison: WP Rocket vs. W3 Total Cache vs. LiteSpeed Cache
WP Rocket
WP Rocket is the premium option — it costs around $59/year per site. It earns that price through genuine usability: sane defaults out of the box, a clean interface, and reliable page cache that works correctly for most setups without requiring manual configuration.
Beyond page cache, WP Rocket includes browser cache headers, static file minification and concatenation, lazy loading for images and videos, DNS prefetching, and database cleanup tools. Most of these can be enabled with a checkbox rather than requiring server configuration.
Best for: Sites where the operator wants reliable caching without deep configuration work. Small to midsize sites on shared or managed hosting where server-level configuration isn’t available.
Worth knowing: WP Rocket doesn’t include object caching. For Redis or Memcached integration, you’ll need a separate plugin (Redis Object Cache is the standard choice).
W3 Total Cache
W3 Total Cache is free and highly configurable — which is both its strength and its problem. Out of the box it requires meaningful configuration to perform well, and the wrong settings produce cache conflicts and unexpected behavior more often than WP Rocket does.
It supports all three caching types natively, including object cache via Memcached or Redis. It also supports CDN integration, browser cache headers, and minification. If you’re comfortable with server infrastructure and want to avoid recurring plugin costs, W3TC can match or exceed WP Rocket’s performance with the right setup.
Best for: Developers or system administrators who will invest time in configuration and understand the implications of each setting.
Worth knowing: The free version includes all the core features. There’s a pro version, but the performance-relevant features are in the free tier.
LiteSpeed Cache
LiteSpeed Cache is free and performs at a different level than the other two — but only if your server runs LiteSpeed Web Server (LSWS) or OpenLiteSpeed. On those servers, the plugin integrates directly with the server’s built-in caching module, which operates at the server level rather than inside PHP. The result is genuinely faster page cache than any PHP-based plugin can achieve.
If your hosting uses LiteSpeed (Cloudways, RunCloud on LiteSpeed stacks, many cPanel hosts), LiteSpeed Cache is the correct choice. On Nginx or Apache servers, it falls back to PHP-based caching like any other plugin.
Best for: Sites on LiteSpeed servers. The server-plugin integration is the best available for page caching without custom Nginx configuration.
Worth knowing: LiteSpeed Cache includes object caching and image optimization features. It’s a full-stack plugin when it’s running on a LiteSpeed server.
Object caching: Redis vs. Memcached
If your hosting environment supports it, persistent object caching is worth enabling. The two options are Redis and Memcached.
Redis is the current standard. It supports more complex data structures than Memcached, persists data to disk (so the cache survives a server restart), and is actively developed. Most modern managed environments (Cloudways, Kinsta, WP Engine) offer Redis as an add-on or include it in higher tiers.
Memcached is simpler and slightly faster at pure key-value lookups, but it’s been largely replaced by Redis in WordPress contexts. If your environment offers both, use Redis.
The Redis Object Cache plugin is the standard WordPress integration — it connects WordPress’s object cache to your Redis instance. Configuration is a single constant in wp-config.php once Redis is running.
If your environment doesn’t offer Redis or Memcached, you can’t use persistent object caching. Plugin-based in-memory caching still helps within a single request, but the cross-request persistence that makes object cache valuable requires a memory store outside PHP.
Browser cache headers
Browser cache is controlled by HTTP headers — specifically Cache-Control and Expires. These are set either by your caching plugin or by your server configuration.
Caching plugins handle this automatically in their “browser cache” settings. The standard approach is to set long expiry times (one year) on static assets with versioned filenames — CSS and JS files with a hash in the filename, for example — and shorter expiry on HTML pages.
The reason for the distinction: a hashed CSS file (style.abc123.css) will change its filename when the content changes, so it’s safe to cache forever. An HTML page at /about/ might change without a URL change, so you want shorter caching or cache revalidation.
If you’re managing your own Nginx server, the equivalent configuration looks like this:
location ~* \.(css|js|jpg|jpeg|png|webp|gif|ico|woff2)$ {
    expires 1y;
    add_header Cache-Control "public, immutable";
}
Most caching plugins set reasonable browser cache headers without manual server configuration. Check your plugin’s browser cache settings are enabled — it’s sometimes a separate checkbox from page caching.
What to actually configure
The configuration that matters most, in order of impact:
1. Enable page cache. This is the single highest-impact setting. Make sure “serve cached files to anonymous users without loading WordPress” or the equivalent is enabled. This means cached pages are served without PHP startup.
2. Exclude dynamic pages from cache. Cart pages, checkout pages, account pages, and any page with user-specific content should be excluded. Most caching plugins do this automatically for WooCommerce. Verify it works by checking that cart contents survive a page reload for logged-in users.
3. Enable browser cache headers. Static assets should be cached for at least a week, ideally a year for versioned files.
4. Add persistent object caching. If Redis or Memcached is available in your environment, enable it. The performance impact is most visible on sites with heavy plugin usage or high traffic.
5. Verify caching is working. Open your site in an incognito window and check the response headers. You should see a Cache-Control header on static assets and either an X-Cache: HIT header or similar indicator that page cache is serving the response.
Note that image optimization is a separate concern from caching — compressing and converting images to WebP reduces page weight, which is different from reducing server response time. The WordPress image optimization guide covers that in detail.
Common mistakes
Caching logged-in users. If your plugin serves cached pages to logged-in users, admin bars disappear, nonces break, and users see stale personalized content. Verify your plugin excludes logged-in sessions from page cache.
Caching the checkout. WooCommerce checkout and cart pages must not be cached — they’re session-dependent. Most caching plugins detect WooCommerce and exclude these pages automatically, but if you’ve done custom checkout development, verify the exclusions are correct.
Minification breaking JavaScript. CSS and JS minification and concatenation reduce file sizes but can break scripts that depend on load order or that aren’t written to tolerate minification. If enabling minification breaks your site, disable JS concatenation first — it’s the most common culprit.
Installing multiple caching plugins. Two page caching plugins active simultaneously creates conflicts and usually results in neither working correctly. Choose one and remove the other completely, including its configuration.
Enabling cache without testing. Caching changes how pages are served. After enabling it, walk through your site’s key flows — contact forms, checkout, search, login — to verify nothing is broken.
A note on hosting
Caching configuration can only go so far if the underlying server is underpowered or misconfigured. PHP 8.x, OPcache with adequate memory allocation, and sufficient server RAM are prerequisites for effective caching — especially object caching. A Redis instance running on a server with 512MB of RAM shared between Redis, PHP, MySQL, and the web server doesn’t have enough headroom to be useful.
This is one reason managed WordPress hosting that includes a configured caching stack performs differently from shared hosting where you’re configuring caching yourself on top of an environment you don’t control.